Overview
How to Download and Read a Grade Report
To download a grade report, please follow the steps below:
- Navigate to the Data Download tab in the instructor dashboard.
- Under the “Reports” section, find the button labeled Generate Grade Report and press it. This will provide a link for you download an CSV file to your computer under the “Reports Available for Download” section, then open it using Excel. For more information on this, please visit this article.
- The report will look like the image below:

The Grade report will have every learner’s Student ID, Email, and Username listed. Beside each learner’s information, their grades can be found.
The first column labeled “Grade” is the student current complete course grade. The following columns contain grades of specific assignments, as well as the averages for each assignment type. All assignments of the same type are grouped together with the combined grade at the end of the listing of individual assignment in a category.
Category of Assignments and Their Averages
When a column is labeled [Category](Avg), this is the average of all grade of a specific type. These averages are weighted differently into the final grade. For more information on the weights of grades, please visit “What Are The Grade Weights?”. If you’d like to change the weighing of grade based on assignment types, contact support.
Generating a Grade Report That Shows Specific Problems
If you find that learner’s have been missing a specific question on an exam or module reinforcement, you may want to look at the Problem Grade Report to see who received the question on the assignment in case you would like to alter it, as well as see other learner’s who received the same question and their corresponding scores.
To download a grade report that shows specific questions, please follow the steps below:
- Navigate to the Data Download tab in the instructor dashboard.
- Under the “Reports” section, find the button labeled Generate Problem Grade Report and press it. This will provide a link for you download an CSV file to your computer under the “Reports Available for Download” section, then open it in Excel. For more information on this, please visit this article.
- The report will initially look like the image below:
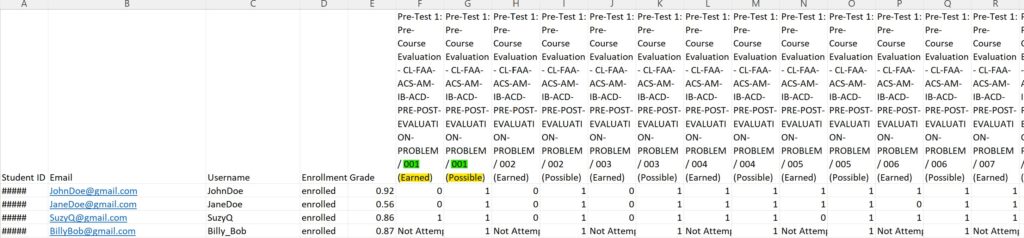
The Grade report will have every learner’s Student ID, Email, and Username listed. Beside each learner’s information, their grades can be found. Highlighted in green in the image above is the question number from the content library. For more information about content libraries, please visit this article. You can use this number to find the specific question in the staff debug info for each question beside the label of display_name.
There are two columns for each question; One column has (Earned) at the end of the question description and the other has (Possible) at the end of the description. (Earned) shows the points the student did received whereas (Possible) shows all the points the student could have received. For example, if a student gets a question wrong and the question had a possible 1 point to earn, (Earned) would show 0 and (Possible) would show 1.
Final Exams
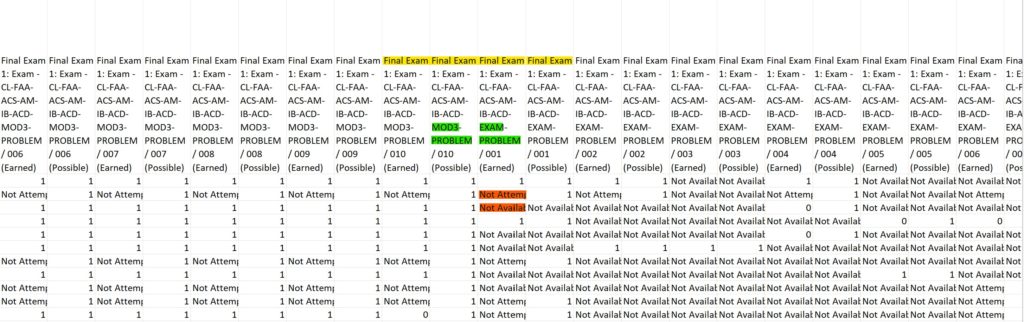
In the example above, the assignment title is highlighted in yellow which in this case is the Final Exam. Below that, highlighted in green you can see where the Final Exam has pulled questions from different content libraries; On the left, the questions have been pulled from the previous Module 3 question bank, and on the right, questions have been pulled from the final exam’s personal question bank.
Highlighted in red is an important aspect of grading questions. “Not Attempted” and “Not Available” mean two different things:
Not Attempted
When looking at a problem report and you see “Not Attempted” listed, this indicates that the student has access and has received the question on their end, but has not yet answered or attempted the question.
Not Available
When looking at a problem report and you see “Not Available” listed , this indicates that the student did not receive the question when the questions for the assignment were pulled from the content library. This should only happen on either Module Reinforcements or Exams.